Napoleonic French Chasseurs a Cheval
I originally wrote this article for online wargames magazine Wargames Journal, and after a request for a copy have decided to republish it here, making some updates.
I developed this technique before I’d even heard of Kevin Dallimore and his layering system. When I switched to 15mm, from my careful blending technique for 28mm, I used to block paint, then wash figures with diluted Daler-Rowney Translucent Brown Cryla acrylic, then go over them again to restore the main colour and leave shadows. I came to the conclusion that it would be quicker to just paint the shadow colour first, forget about the wash, and then paint the mid-tones.
I largely think that for wargames purposes, two-tone shading is enough, even on 28mm figures. I do sometimes add a highlight to cheeks and noses on faces because it makes the face of even a 15mm figure pop. I don’t like hard black-lining, and my technique gives a softer effect. I still use it to this day, whenever my failing eyes let me.
Ian Marsh, 2 May 2015
===
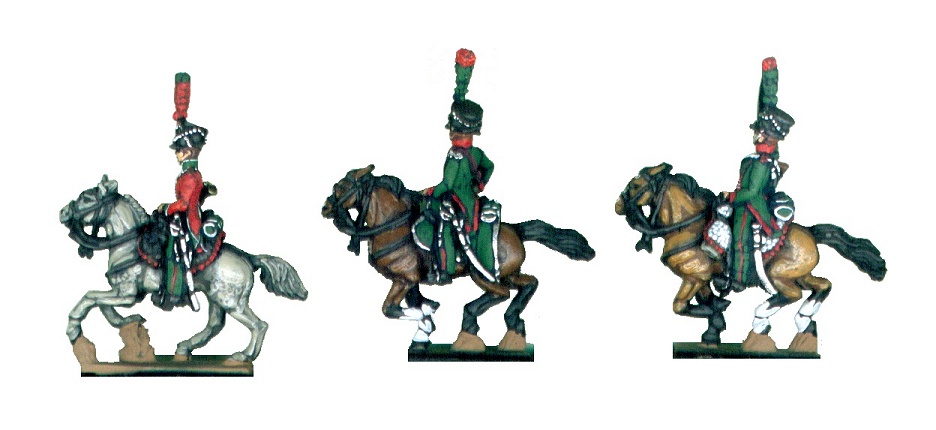
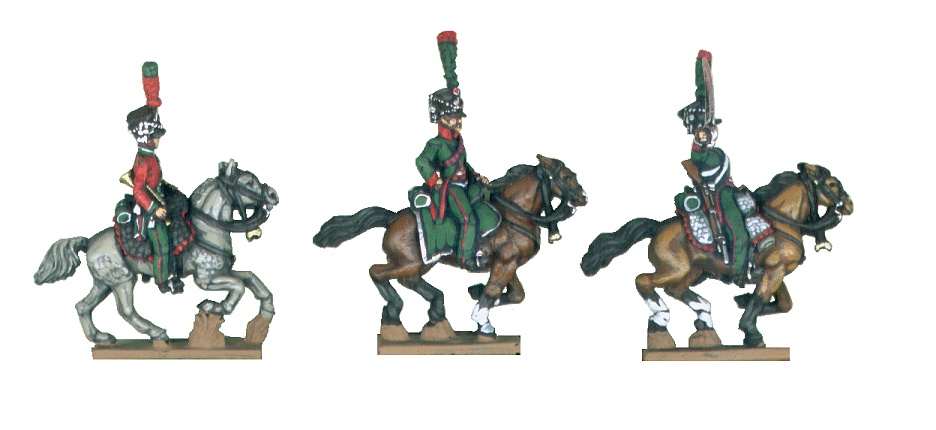
Hussars may be the dashing troopers of a French Napoleonic army, but chasseurs a cheval were far more numerous – and easier to turn out in quantity because of their lack of lace and fur trim. That doesn’t mean they’re dull to paint, because variations in the uniforms, such as brightly coloured and laced waistcoats, and different patterns of plume mean that these green-clad troopers are anything but plain.
The layering technique used here is the same as that employed for the 15mm French infantry in issue 1 of Wargames Journal. The aim is simply to shade major areas of a figure with a deeper hue of the base colour, and to paint the main colour over it, leaving borders of shade between differences in relief on the moulding and between different colours. Although close up the effect can seem artificial, subtle shading isn’t as effective on figures in this scale, and the sharp contrast in colours works at a normal viewing distance.
Although uniforms in the Napoleonic period are well detailed, there are none the less considerable discrepancies. I’ve used both Osprey and the excellent plates by Andre Jouineau in FG Hourtelle’s Wagram as guides for painting the 1st chasseurs a cheval covered here. Colonel’s discretion is still required – sometimes, a best guess is all that is possible.
Again, the figure used are from AB. Slightly larger than most 15mm ranges, these figures are well detailed, with plenty of folds that make finding the shadow areas of a figure easy. The horses are particularly well sculpted, with clear musculature that makes applying highlights easy. In addition, the horses have correctly positioned legs, rather than the unfortunate pantomime horse gaits of some ranges.
For comments on paints and brushes, see the article on French infantry. However, I will specifically make use of Colour Party horse colours later on.
Preparation
Clean up riders and horses using a scalpel or craft knife and a rat-tail file to remove mould lines and flash. Level the underside of the bases. Pay attention on the horses to the gap between the legs, and drill out flash joining the front legs if necessary. On galloping horses, don’t be tempted to remove more than one support from raised legs otherwise the horse will bend too much in use. On riders, carefully remove excess metal between the scabbard and the saddlecloth and the scabbard and the rider’s leg. Always wear protective glasses while cutting flash, as a knife blade can easily snap.
Mount the horses onto temporary card bases to ease handling while painting. I prefer to mount horses singly so that they can easily be rotated while painting. A blob of PVA glue should be more than adequate to hold a horse to a temporary card base and allow the finished figure to be popped off later with the help of a craft knife. Let the glue dry.
Dry assemble riders and horses, finding the best rider for each horse – some riders just don’t fit some horses as well as others. Then fix the riders to the appropriate horses using a small blob of five-minute epoxy adhesive, taking care to remove any excess that squeezes out from under the saddlecloth onto the horse. Allow to dry for 24 hours.
For the purposes of illustrating this article, I have not assembled the riders and mounts so that the painting stages can be seen more easily.
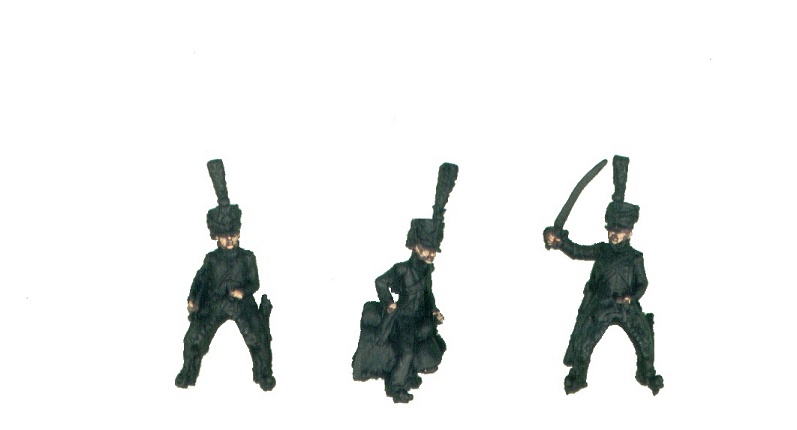
Stage 1

Black prime the assembled riders and their mounts. As horses have a greater amount of undercut areas than foot figures, brush priming is most effective. Apply a thin, even coat of matt black enamel paint; don’t let it pool in hollows. When the paint is fully dry, give the figures another light coat of matt black either using a brush or an aerosol. A combination of brush priming and spray priming produces an even black coat: the brush prime tends to fill the hollows and the spray primer tends to stay on the raised areas. The aim is to produce a light, even coat of paint that doesn’t hide the detail of the figure. [Update, 2/5/2015: the formulation for Humbrol enamels, which I used to use as a brush-on base coat, has changed. I now tend to use a matt black acrylic aerosol, and touch up missed areas such as undercuts with matt black acrylic. I have never found it necessary to use a specialist primer.]
Stage 2

Once the primer is dry – again, leave about 24 hours – apply a soft brown paint to the riders’ faces, hair and hands. A burnt umber provides a strong effect; for a softer finish, use a brown about the colour of milk chocolate (something like Foundry Dusky Flesh shade, 6A).
Stage 3
Finish the faces and hands using your preferred flesh colour. With a finely pointed brush, paint flesh down the nose of each rider. Draw the brush along the top and bottoms lips, then blob in the chin and cheeks. Extend the blobs on the cheeks downward to the jaw line, then work the brush up the jawline and up to the ears, leaving a line of shade colour to represent sideburns or to provide shadow colour for the chinstraps of the shako. Moustaches can be represented simply by not painting the upper lip. The aim is to leave fine lines of the shade colour to represent the mouth and eyes and to define the nose.
Blob in the back of each hand and then with a finely pointed brush draw down the fingers and thumbs. If such fiddly fine work is beyond your patience or skill, just blob in the whole hand.
Stage 4

Apply the shade colour of a dark bluey-green to the jackets, overalls, valises and plumes of officers and troopers, without running the colour over onto the waistcoats or turnbacks. Paint the saddlecloth of the officer the same colour. On trumpeters, just paint the overalls, valise and waistcoat, the tip of the plume, the collars, cuffs and turnbacks; leave the jacket black because the trumpeter is painted in reverse colours. [Update, 2/5/2015: A colour such as Coat d’arms 155 Angel Green works for this.]
The shade colour will dry very dark, almost blue rather than green, and from a distance will be indistinguishable from black. However, it provides a softer contrast than pure black with the main colour, and the difference will be noticeable on the finished figure.
Stage 5

Time for two more shade colours. First, paint the sheepskins of the troopers a light bluey-grey, without straying onto the troopers’ overalls or the houndstooth edging of the sheepskin. Leave the trumpeter’s sheepskin black; although trumpeters were not unknown to have white sheepskins, they were supposed to have black ones. [Update, 2/5/2015: I used to use DecoArt Heather Blue; Coat d’arms 150 Shadow Grey is a near equivalent.]
When this shade colour is dry, with a warm brown such as a burnt umber, paint the trumpeter’s jacket, avoiding the collars, cuffs and turnbacks, the houndstoothing of all the sheepskins, and the collars, cuffs and turnbacks of the troopers and officers. Use a finely pointed brush for the collars, cuffs and turnbacks to avoid spreading the shade colour onto the green applied in the previous stage. The brown provides a strong shade colour to edge the red facings of the 1st regiment. It is not as important at this stage to have the brown follow the same pointed shape of the cuffs – their shape is far more noticeably defined by the facing colour itself. Paint the tips of the officer’s and troopers’ plumes brown, and the base and bulk of the trumpeter’s plume.
Stage 6
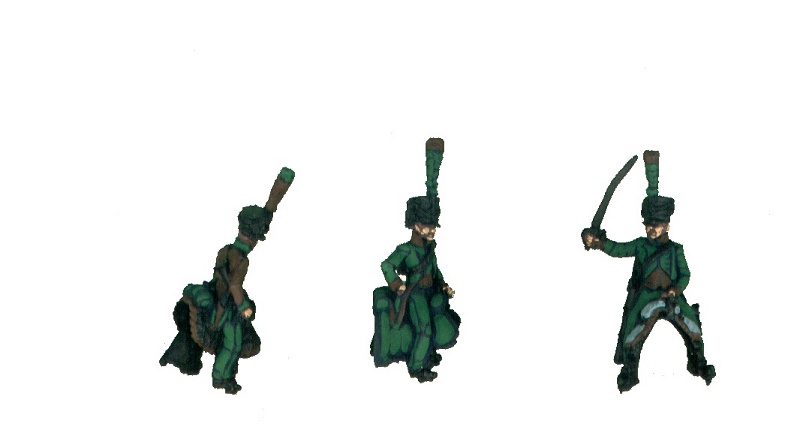
It has taken me several years to find a satisfactory deep mid-green for 15mm figures. Most craft ranges are too bright, most hobby ranges are too dull. DecoArt’s Hunter Green, however, stands out well on the tabletop, contrasts well with a bluey-green shade colour, and serves for French cavalry and Russian infantry alike. An equal mix of Foundry’s shade colours for Bright Green and Forest Green gives a near equivalent , but lacks the straight from the pot convenience. [Update, 2/5/2015: I would now use Coat d’arms 523 US Dark Green.]
Whatever you preferred green, use it to paint the lapels, jackets, overalls and valises of the troopers, being careful not to paint into folds or recesses, and to leave a thin line of the shade colour where the lapels meet the jacket, next to belts, and down the central seam of the overalls. On the officer, also paint the saddlecloth, leaving shade colour in folds and a border of the shade colour round the whole saddlecloth. On the trumpeter, paint the overalls, waistcoat and valise, and, with a finely pointed brush, the cuffs, collars and turnbacks, again leaving a thin line of dark green where it meets the brown shade colour of the jacket.
Blob green on the shaded areas of the plumes – just the tip of the trumpeter’s, and the body and pompom of the other figures’ plumes. The blobs will leave tiny patches of shade colour that will give the plume more depth.
Stage 7

With a finely pointed brush, paint the collars, cuffs, waistcoats and turnbacks of the officers and troopers in red, taking care to point the cuffs at this stage. Leave a thin edge of brown where these meet the green of the uniform, and leave tiny fillets of brown in the waistcoats. With a steady hand and a finely pointed brush, put a thin red line down the centre seams of all the figures’ overalls, just to one side of the dark green line left at the previous stage, and pipe the lapels and shoulder straps. [Update, 2/5/2015: My favourite red for the job is Vallejo 909 Vermillion.]
Paint the jacket and shoulder straps of the trumpeter, leaving a thin line of shade colour next to the trumpet cord, and areas of brown in recesses and folds.
Blob red on the tips of the officer and troopers’ plumes, and do the same to the body and pompom of the trumpeter’s.
Gently blob round the houndstoothing on the sheepskins to get red on the tips of each tooth and leave brown at the base and between each tooth.
Stage 8

The riders will start to look complete in this stage. With a finely pointed brush, draw white along the crossbelts of each trooper, leaving a tiny fillet of black around the buckles at the back. Do the same to all valise straps (there’s every argument that these should be black, but those plates which show these vary in the detail, and white stands out nicely), and the sword belts, straps and knots (except the officer’s). [Update, 2/5/2015: I always slightly dilute my white with water. Using neat paint can add too much coarse texture to belting. If necessary use a second thin coat to build intensity. My preferred white is Coat d’arms 101 White, which has good flow qualities.]
Blob in the cockade on the front of the shako’s and lightly blob round the shako cords in a regular pattern. On the troopers’ sheepskins, apply a pattern of irregular blobs, merging some and leaving others distinct, to give an impression of a fleece.
Details on bugle cords are hard to find, with red and white among those shown in plates. As white stands out best for this regiment, use a finely tipped brush to gently blob round the trumpet cords and tassles. Carefully pipe the trumpeter’s collar, cuffs and turnbacks, the edges of the trumpeter and troopers’ valises, and lace all except the officer’s waistcoats with a few fine lines of white.
If you make mistakes edging the trumpeter’s facings, correct them now; while you have the green out, take the opportunity also to pipe his shoulder straps and correct any mishaps made when applying red to overalls and turnbacks.
Stage 9

Using a deep brown, such as raw umber, paint the wood of the carbines, the trumpet and the officer’s shoulder belt.
Blob the centre of the cockade with red. Don’t try for the blue later using this scale of figure; it will invariably go off-centre and look poor.
Stage 10

Paint the officer’s shoulder belt crimson, leaving some dark brown in the hollows. With a golden brown, paint the stocks of the carbines, leaving a fillet of dark brown next to the barrels and adjacent to the figure. Optionally, use the same golden brown to highlight moustaches and some of the men’s hair to provide variety in the unit.
Stage 11

Paint the carbine barrels and locks silver, leaving black in recesses and next to the brown shading of the stock. Also paint silver the chinscales, shako lozenges, stirrups, sabres (including the guards) and scabbards, leaving thin lines of black at joins. If the back of the sabre faces towards the figure, leave it black to form an intense shadow. It will help make the sabre look thinner than if it is painted solid silver.
Edge the officer’s shabraque and valise, leaving a line of dark green between the silver and mid-green. Blob round the shako cords in a regular pattern. If you feel up to it, lightly blob silver up the red seams of the officer’s overalls to represent buttons. Lightly draw silver over the swordknot and epaulette(s).
Plenty of potential for variation exists in the officer’s uniform, with extra silver lace, overall stripes and so on. The guidance above is a basic example.
Paint the trumpet gold or brass, leaving brown inside the bell and next to joins with other parts of the figure.
Stage 12

Using a warm dark grey, paint the blanket rolls if visible, leaving brown between the rolls and the shade used for the houndstoothing.
Stage 13

Paint the blankets a warm light grey, leaving shade colour close to the horse and the sheepskin.
Stage 14

Using black, clean up overruns of other colours on boots, shakoes, stirrup straps, reins, cartridge boxes and the trumpeter’s sheepskin. Also clean up any overruns onto the horse.
Then, with a deep bluey-grey, highlight the black areas of each figure – the reinforcing bands of the shakoes, toes of the boots, shako peaks and so on. Don’t apply too much – leave enough true black to avoid the areas looking too grey and washed out. Blob an irregular pattern onto the trumpeter’s sheepskin. [Update,2/5/2015: Nowadays I would use Coat d’arms 516 Iron Grey for a subtle effect, or 533 Slate Grey for a more pronounced effect.]
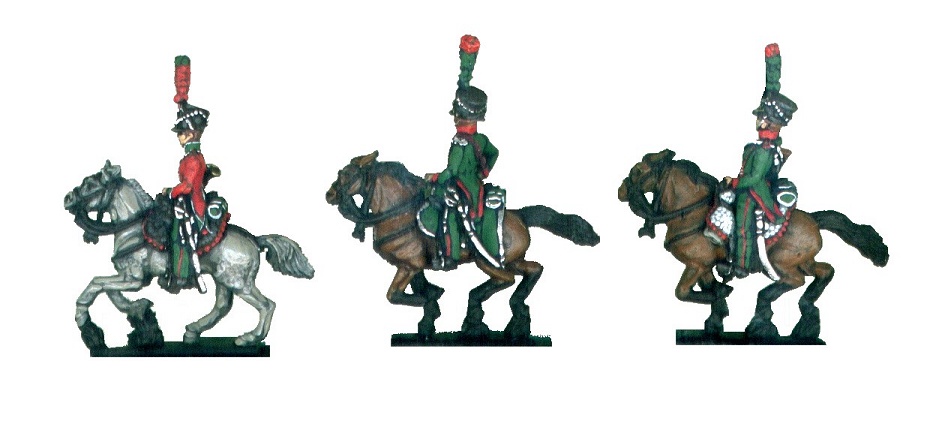
Stage 15

The men are now done and now it’s time for their mounts. Specialist horse colours such as those produced by Colour Party allow very effective looking horses to be produced quite simply – if not quite in the way that the colours are intended. Colour Party horse colours have a strong sheen to them when they dry, and a noticeably different fluidity on the brush. The following technique uses them diluted with water, which tones down the sheen and makes the colours more translucent.
Here I’m going to use Colour Party HS 10 Roan and HS 14 Chestnut to produce a dark bay like horse, HS 14 and HS 22 Palomino to create a lighter bay, and HS 21 Light Bay and HS 39 Grey Bay for the trumpeter’s grey. Few of the names of these colours accurately describe the horse colour they are meant to represent, but this doesn’t matter as it’s the hue that’s important.
Paint half the horses with a dark brown (HS 10), thinned with about 50 per cent water. Paint right up to reins and harness. Don’t apply any brown paint below the knees of the horses or to their manes and tails. Leave the eye sockets black.
Paint the trumpeter’s horse with thinned HS 39 (a mid warm-grey, or alternatively try a blue-grey), but this time paint the mane, tail and the whole of the legs. Again, leave the eye sockets black.
Leave the other horses for now.
As the paint dries, it will look slight patchy, being darker on raised surfaces and feathering towards the black edges.
Stage 16
Using a mid golden-brown (HS 14), paint unpainted horses in the same way as you did using the dark brown. Leave the leg below the knees, the manes, the tails and the eye sockets black. You’ll now have half the horses done in dark brown, half in golden-brown, and the trumpeter’s horse all in their base coats.
With the same thinned golden brown, highlight the muscles of the horses shaded in dark brown. Make sure you cover any patchy areas of the bases coat on raised surfaces. When this coat dries, again it will feather at the edges, giving the impression of a more gradual transition of colour.
Mix equal quantities of HS 39 (the warm grey “grey bay”) and HS 21 (cream, so-called light bay) to create a creamy grey. Thin with water. On the flanks of the trumpeter’s horse, paint small, incomplete circles, some blending into each other, and then paint most of the musculature, leaving the darker base showing in the shadows. We’ll be adding a final highlight coat in the next stage to make the grey look more convincing. Greys in general benefit from a three-stage process to get the best effect. Lightly drag a fine brush down the strands of the mane and tail, so that the hair is lightly highlighted and remains largely darker than the body of the horse.
Stage 17
Thin the light golden brown horse colour (HS 22, palomino) with water and highlight the horses that have a mid-brown shade colour. Again, don’t apply paint to the manes, tails and lower legs.
Mix one part warm grey or bluey-grey with three parts cream, thin to 50:50 and highlight the grey. Add a few sworls to the dappling to increase the depth of this effect. Very lightly draw this colour down the mane and tail, and only lightly highlight the lower legs of the trumpeter’s horse.
Stage 18

Touch up any overruns onto the harness, and the manes and tails of the brown horses using black. Dot in the eyes if they have been obscured by the base colours. Never use white to create a pupil, as this is seldom visible in a horse’s eye – simply dot in the eye using black, to avoid a freakishly fairground appearance.
Use a deep bluey grey and draw it down the strands in the manes and tails of all the brown horses. With the same colour, highlight the black leather straps of the harnesses of all the horses.
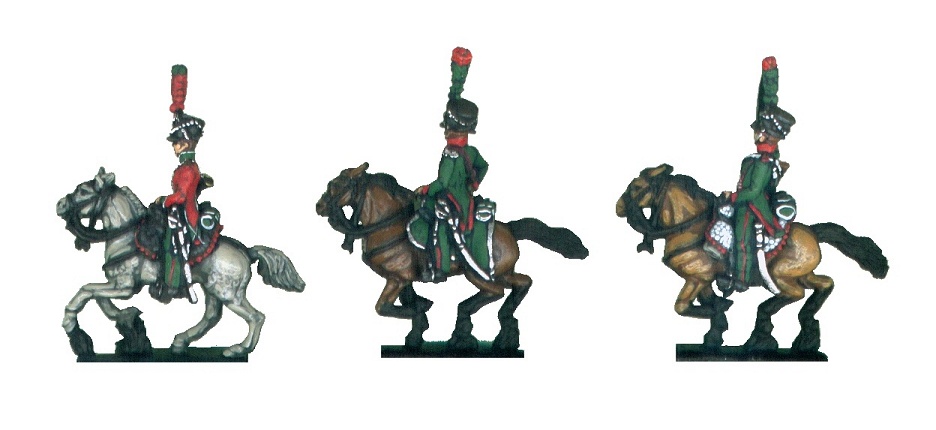
Stage 19
Add white socks and blazes to the brown horses. Almost every brown horse has white socks and a blaze, with socks usually in pairs or fours (threes are rare). Just add white to the very lower part of the horses’ legs. Blazes can be tiny stars of white in the centre of the horses’ head, or long irregular flashes down to the nose. The bridle may make it hard to represent these, so settle for a few white noses.
Paint the base an earth colour ready for basing.
Stage 20 (a and b)

Paint the bits silver and other metallic plates gold.
After the figures are thoroughly dry, varnish them using two light coats of matt spray varnish. Allow each coat to dry completely. Matt varnish goes glossy if applied too heavily, so using two light coats will leave them matt or with a slight, warming sheen.
The figures can simply be popped off their temporary bases if they’ve been stuck down with PVA glue. Either they’ll pull off with little resistance or they’ll need lifting off with the help of a scalpel blade.
Basing figures is worthy of an article in itself. For the sample unit here [Update, 2/5/2015: Wargames Journal provided the picture for this part of the article, and I regret that I cannot illustrate it], I again used a simple gritting technique. First the figures were stuck to their final bases, and once the glue had dried, the base surrounding the figures was painted with dilute PVA and dunked in sand. The aim is to level off the top of the base, so the sand comes up to the top of the base of the figure, not over it. Once dry, the sand and the figure’s base itself were painted with a slightly diluted mix of light earth brown acrylic paint and PVA, which was drybrushed sand when dry. Patches of dilute PVA were then dabbed on top and the whole dunked in green static grass. If you can, apply grit and static grass in a separate area from your painting table to avoid foreign bodies in future paint jobs. [Update, 2/5/2015: Nowadays, rather than grit and paint, I simply use Coat d’arms 407 Sandy Brown Brushscape for basing, and its equivalent untextured colour 116 Barbarian Leather on the base edges.]

Leave a comment